Surfer supports the use of files with different coordinates systems to create layers in the same map. As long as each layer in the map has its own source coordinate system defined, Surfer will reproject the layers on the fly to the target coordinate system for the map.
If you overlay maps and one or both layers disappear, it is likely that the layers are in different coordinate systems. The steps in this article will resolve this issue.
For example, let's overlay a contour map in State Plane coordinates with data in UTM coordinates, and display the map in lat/lon coordinates. To do this:
- Click Home | New Map | Contour, select Diablo.grd from the Surfer Samples folder and click Open. The map is created.
- Click the Contours layer in the Contents window,
- In the Properties window click the Coordinate System tab. You can see that the layer is already set to the State Plane 1927 California III coordinate system. If no coordinate system was defined for this layer, you could click the Set button and set the coordinate system to the appropriate system of the grid file. Note that this is the coordinate system of the grid file you used to create the layer, it is not what you want to convert the map to (that comes later).

- Now let's add another layer in a different coordinate system. Click Home | Add to Map | Layer | Post, select Diablo Example.dat from the Surfer Samples folder and click Open.
- Click No in the Surfer Warning dialog that says the new layer (the post layer) exceeds the current map limits. This data set is unreferenced and in a different coordinate system so this message is expected.

- The new Post layer has been added to the map (you can see it in the Contents window), but you can't see it on the map. That's because the coordinate system is not set for it yet. Select the Post layer in the Contents window and in the Properties window click the Coordinate System tab. The Name shows Unreferenced local system.
- Click the Set button. This is where you can tell Surfer what the coordinate system was used to create the data file for the post layer.
- In the Assign Coordinate System dialog, select Predefined | ProjectedSystems | UTM | North America | NorthAmericaNAD83zone10N and click OK. Once you tell Surfer the coordinate system for the post layer, Surfer knows how to convert it to the coordinate system of the map and the points are displayed in the plot window.

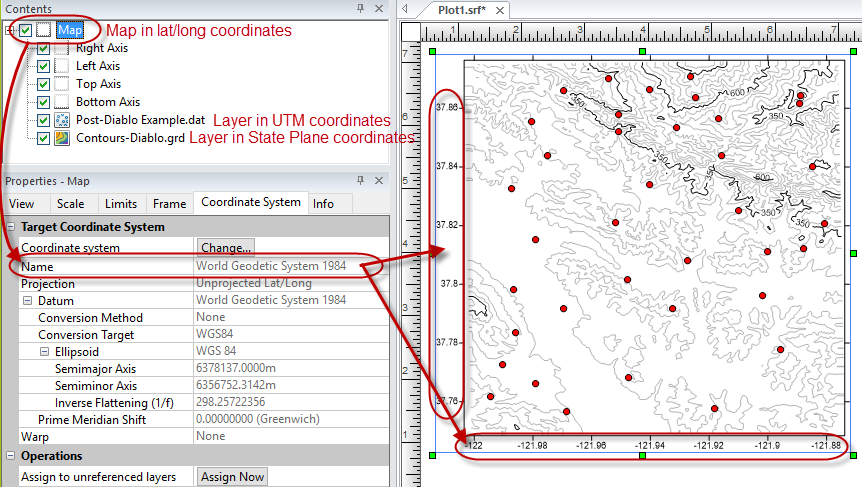
- Now we can change the target coordinate system of the map. This controls the coordinates displayed by the map in the plot window. Select Map in the Contents window and in the Properties window click the Coordinate System tab.
- It currently shows State Plane 1927 California III as the coordinate system, since that was the coordinate system of the first layer we created. We can change this to anything we wish by clicking the Change button.
- In the Assign Coordinate System dialog, select Predefined | Geographic(lat/lon) | WorldGeodeticSystem1984 and click OK. The coordinate system of the map in the plot window is changed to lat/lon and both of the layers are reprojected on-the-fly from their respective source coordinate systems to the target coordinate system.
Updated November 2021
Comments
Please sign in to leave a comment.