Surfer can easily convert the coordinate system (e.g. projection and datum) of any supported file format! You may want to convert the coordinate system of data, image, vector or grid files (e.g. from geographic lat/long to UTM) for a variety of reasons, such as calculating volumes in specific units or for use in other software packages that do not support coordinate systems.
See the outlines below the exact steps to follow to convert the coordinate system of four different types of file formats:
- Raw data (e.g. CSV, DAT, XLSX, and TXT)
- Vector and Image files (e.g. DXF, SHP, E00 or TIF, BMP and JPG)
- Grid or DEM files (e.g. GRD, ASC, FLT, and DEM)
Raw Data
You can convert the coordinate system of raw data using the Surfer worksheet. To do this:
- Click File | Open in Worksheet, select the data file and click Open. It opens in the Surfer worksheet.
- Click Data | Coordinate System | New Projected Coordinates.

- In the New Projected Coordinates dialog, you must tell Surfer what columns are to be converted, what coordinate system the data is currently in, and what coordinate system you want the data to be in.
- Specify the Source Columns for X and Y. These are the columns in which the original X and Y data are located.
- Click the (…) button to the right of Source Coordinate System.
- In the Assign Coordinate System dialog, select the current coordinate system of the data and click OK.
- Specify the Target Columns for X and Y. These are the columns in which you want the converted data to be stored. These must be different than the original source columns. By default, the first two empty columns are selected.
- Click the (…) button to the right of Target Coordinate System.
- In the Assign Coordinate System dialog, select the coordinate system you want to convert the data to and click OK.
 |
| Set the source data columns and coordinate system, and specify the coordinate system and columns for the converted data. |
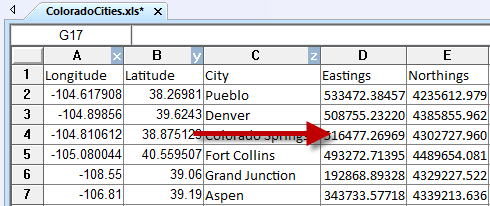
- Click OK and the data is converted. The target columns are populated with the converted data.
 |
| The source data is converted to the target coordinate system in the specified columns. |
- Click File | Save to save the data file for future use, and File | Close to close it.
Vector and Image Files
You can also convert the coordinate system of any base map file, such as vector files and image files. The steps are:
- Click Home | New Map | Base, select the vector or image file and click Open. The base map is created.
 |
| Create a base map from the file in the original coordinate system. |
- Verify that the original, source coordinate system is defined for the Base layer.
- In the Contents window, select the Base layer.
- In the Properties window, click the Coordinate System tab.
- The original coordinate system must be specified. In some cases (e.g. you have a georeferenced image file or a PRJ projection information file), this information is automatically entered. If the existing coordinate system is already listed, you can skip to step 3. If not, and the Name says Unreferenced localsystem, then you will need to manually specify the file’s current coordinate system. To do this:
- Click the Set button.
- In the Assign Coordinate System dialog, select the coordinate system of the imported file.
- Click OK.
- Now the map can be converted into the new coordinate system.
- Click Map in the Contents window.
- In the Properties window, click the Coordinate System tab.
- Click the Change button.
- In the Assign Coordinate System dialog, select the coordinate system you want to convert the image or vector file into.
- Click OK. The map on the screen is converted to the new coordinate system.
 |
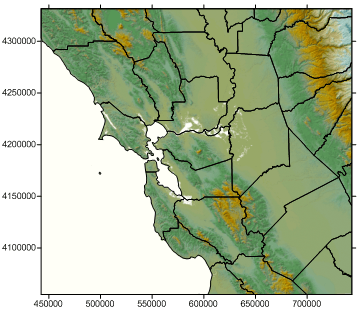
| Change the coordinate system of the map to convert the base map data. |
- In the Contents window, uncheck the four axes (Right Axis, Left Axis, Top Axis, Bottom Axis).
- Export the converted image or boundary file to a new file.
- Click File | Export, give the file a name, choose the file format to save it to (e.g. SHP, DXF, or TIF file), and click Save.
- In the Export Options dialog, click the Spatial References tab. It is recommended that you save the spatial reference information in one or more of the available formats (the formats available depend on the file format that is being exported). This way, the information will be saved for when you use the file again in Surfer or in another software package.
- Click OK. This new file is in the new coordinate system.
Grid Files
Reproject grid files using the Grids | Edit | Project command. See the steps below the image.
 |
| Reproject a grid with Surfer's Grids | Edit | Project command. |
- Click Grids | Edit | Project.

- In the Grid Project dialog, select the input grid from the dropdown list, or click Browse, select the grid, and click Open.
- Click the Set button in the Input Grid section.
- In the Assign Coordinate System dialog, navigate to and select the input grid's current coordinate system.
- Click OK.
- In the Output Grid section, click the Change Filename (yellow folder) icon.
- In the Save Grid As dialog, enter a File Name and click Save.
- Click the Set button in the Output Grid section.
- In the Assign Coordinate System dialog, navigate to and select the new coordinate system.
- Click OK.
- If desired, check the Resize output grid box, and enter new values for # Rows and # Cols.
- If desired, choose a different Resample method.
- Click OK.

- In the Export options dialog, check any desired spatial reference file types. I recommend at least checking GS Reference (Version 2) file, if continuing work in Surfer.
- Click OK.
- Click OK in the Surfer dialog alerting you that the grid was created.
Converting the coordinate system of any data is a powerful feature in Surfer. There’s no need to use other software packages for this task and complicate your workflow. It allows you to exchange data with colleagues without worrying about mixing and matching coordinate systems, you can perform calculations and get results in the units you need, and you can use a multitude of different software packages ensuring complete compatibility.
Updated November 2021
Comments
Please sign in to leave a comment.